▷ How to Remove Acrylic Nails | Best Pro Tips

Step-by-Step Guide to Safely Removing Acrylic Nails
Hello there! I'm Daniella Fer, the proud owner of Dan's Nails. Today, we're diving into the art of safely removing acrylic nails. This guide is crafted for everyone, from novices taking their first steps in nail care to seasoned professionals seeking to refine their techniques. We'll navigate the removal process, highlighting the essential products and their roles. And that's not all – I'll also share some exclusive tips on nurturing your natural nails post-removal. Are you ready to embark on this journey? Let's begin!!
First Things First: What Are Acrylic Nails?
Acrylic nails are extensions designed to be placed over natural nails as a fashion statement. While some of these extensions seek to replicate the appearance of natural nails closely, others choose to deviate intentionally in favor of artistic expression.
As a nail technician, I have been able to transform countless hands with acrylic nail art. They're not just any nail extensions; they're a fashion statement! What's so cool about them? They're like mini canvases for your style, from classic to ultra-modern designs, and let's be clear: everyone loves them. You'll have an infinite world to create nail art at home or for your salon clients.
What Are They Made Of?
They are made out a two-part cosmetic acrylic system: acrylic powder and liquid. The acrylic powder (polymer) dries quickly when mixed with the liquid agent (monomer). For this reason, they do not require a UV lamp for drying, as gel nails.
- Liquid Monomer: A monomer is a small molecule that binds to other monomers to form polymers through covalent bonds. These molecules are based on acrylic and methacrylic acid derivatives, which polymerize through reactions activated by photoinitiators or thermosensitive initiators. Ethyl methacrylate is preferred in the formulation of the best liquid monomers for cosmetic use, in contrast to methyl methacrylate. This preference is because ethyl methacrylate offers better quality and safety in polymer formation.
- Powder Polymer: Acrylate polymers, also known as acrylics or polyacrylates, are a group of transparent, tough, and elastic polymers created from acrylate monomers. Commonly used in cosmetics, such as nail polishes and adhesives, these compounds are characterized by an unsaturated carbonyl structure with carbon-carbon and carbon-oxygen double bonds. In the creation of acrylic nails, the liquid monomer, composed of molecules that can form long chains, reacts with the powdered polymer to develop these chains, forming durable and aesthetic acrylic nails.
When applied, this combination adheres to the natural nail, creating an extended, hardened nail surface that can be shaped and painted. The acrylic nails are known for their robustness and longevity, making them a popular choice for those looking to enhance the appearance and functionality of their nails.
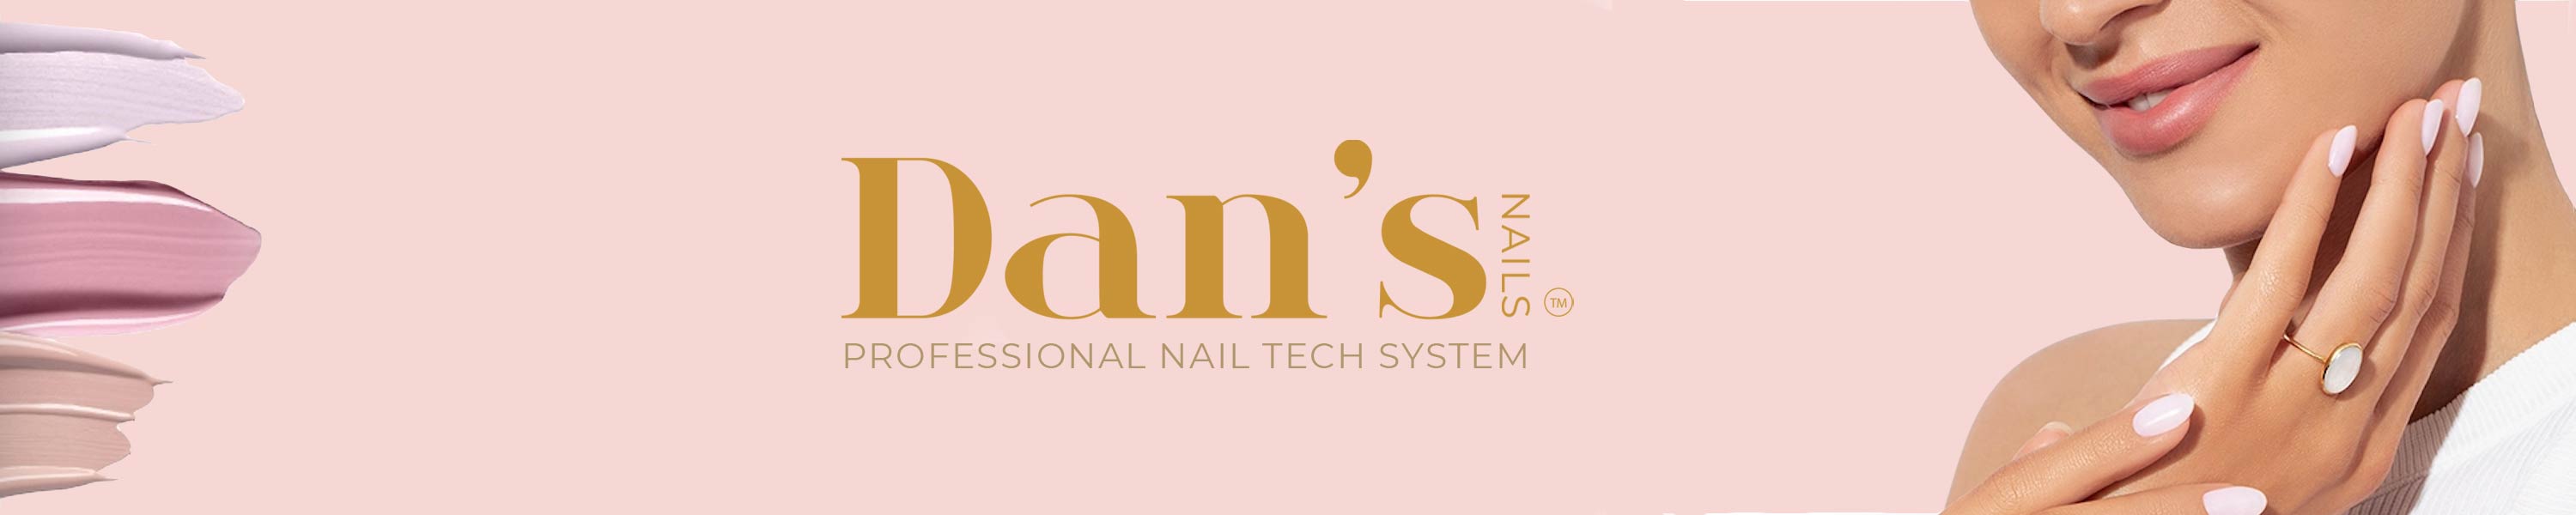
Tools to Take Off Acrylic Nails
Understanding what each tool is and its purpose is key in preparing for the acrylic nail removal process:
Nail Clippers:
This tool and the others are a must-have for every professional nail tech or enthusiast manicurist at home. They are standard manicure tools for cutting and shaping nails. They are available in various sizes and are usually made of stainless steel.
100% Acetone
Acetone is one of the professionals' best friends, too, as it will always be present when creating or correcting any mistakes you make. It is a powerful and fast-acting solvent, widely used to care for and treat natural and fake nails and to remove nail polish, gel, and acrylic. It is known for its effectiveness in breaking down nail polish.
Nail File with 80/100 Grit:
Without a nail file, it is difficult to remove the nails themselves altogether; it is a tool used to remove the remains of acrylic or gel polish and to shape and smooth the edges of the nails. The 80/100 grit file is a specific type with a coarse and finer surface; the coarser 80 grit part is ideal for filing thick nails, such as acrylic nails.
Aluminum Foil:
The aluminum foil we all have in our homes is the same foil we use to remove acrylics, so this is easy for everyone.
Cuticle Pusher:
This tool is used in manicures and pedicures to push back and shape cuticles. It can be stainless steel or orange stick, as both work very well, and each has its preference for use.
Cuticle Oil:
Is a moisturizer for nails and cuticles. It usually contains several vitamins and is designed to moisturize and nourish the nail bed and surrounding skin.
Petroleum Jelly:
Like cuticle oils, it is a moisturizer, but I recommend it for removing acrylics because it protects the skin from the dehydrating effects of products such as acetone.
Nail Hardener:
A clear polish formulated to strengthen and harden natural nails. It is often used after removing polishes or acrylics to help restore the strength of the natural nail.
Each tool plays a distinct role in acrylic nail removal, ensuring effectiveness and safety.
Step by Step to Remove Acrylic Nails
- Step: Begin using a nail clipper to trim the acrylic nails, carefully avoiding injury.
- Step: After trimming the nails, it is essential to file them. This step will reduce the top layers, creating porosity for better results. Remember to use a 100/180 grit file for this process.
- Step: To remove the acrylic, it must be melted. Place a piece of cotton soaked in Acetone on each nail, wrap it with aluminum foil, and leave it for 10 to 20 minutes.
- Step: Remove the foil one finger at a time and gently remove the acrylic to care for your nails with the help of a cuticle pusher or an orange stick. If you notice that there is still acrylic remaining, repeat the previous step and continue with the next finger.
- Step: After removing all the acrylic, moisturize your cuticles to make them look radiant again. Use cuticle oil rich in vitamin C, or opt for petroleum jelly. Apply a hardener to your nails to add a protective layer - your nails are ready to look flawless!
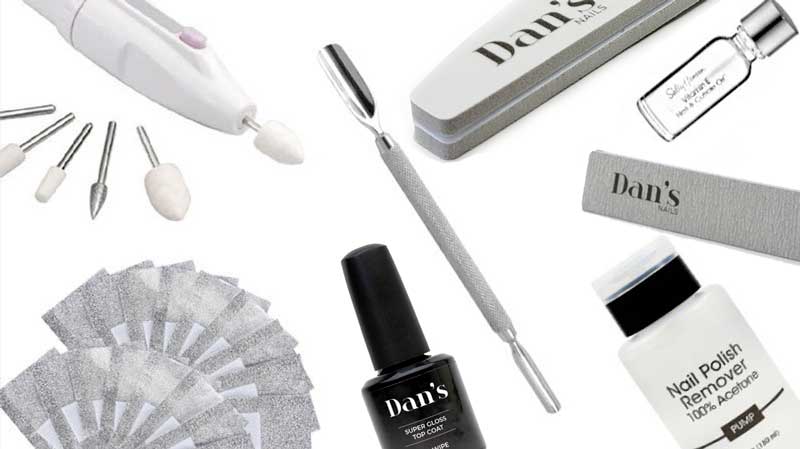
How do you Remove False Nails at Home Without Acetone Fast?
There is an option to consider when removing acrylic nails at home fast without using Acetone, especially for those sensitive to this chemical or those seeking alternative approaches.
Necessary Tools
E-File (Nail Drill)
My beauty salon occasionally uses an E-File to carry out this process really fast. However, it's important to note that its application requires a steady hand and a deep understanding of nail anatomy to avoid any damage. This device, similar to a drill, demands careful skill to ensure effective acrylic removal without compromising the natural nail's health. Its use involves a meticulous and precise approach to ensure satisfactory and trouble-free results.
Alternative Methods: Debunking Myths
Let's dive into the world of DIY acrylic nail removal. You might have encountered home remedies like soaking nails in warm, soapy water or using dental floss. I've included a video to give you an accurate picture. It shows how soaking in warm, soapy water, a popular DIY method, falls short of expectations. This revelation challenges the widespread notion that natural methods are always effective.
Moreover, I've added another video for contrast. Someone attempts to remove acrylic nails using hot water and soap. These nails hadn't been prepped with a dehydrator or primer – two critical elements for nail durability and protection. This case brings to light the significance of these preparatory steps. They're not just add-ons; they're essentials for ensuring strong adhesion and safeguarding against moisture, which can lead to premature nail detachment.
These videos aren't just clips; they're eye-openers. They emphasize why professional techniques and the right products matter. By exposing the limitations of these home methods, we're not just debunking myths; we're reinforcing the value of sticking to tried-and-tested approaches. Together, let's journey towards better nail care, embracing methods that genuinely work.
Remove Them Using Hot Water, Oil, and Soap - Debunked
@morghyn_nailedit Hot water, dish soap & oil soak off... ?! ? #fyp #foryou #nailhacks #acrylicnails #nailtutorial #soakoff #nails ♬ Lofi - Domknowz
When Should Be Removed?
At Dan's Nails, our experience suggests scheduling a touch-up every two to three weeks. Why? It's not just about keeping your nails looking impeccable. Regular maintenance plays a crucial role in preserving the health and durability of your nails. But here's a tip: Keep an eye out for any lifting or discomfort. These are telltale signs that it's time for a change. Whether it's removing the current set or getting ready for a fresh one, responding to these cues is key to keeping your nails in top condition. Remember, timely intervention can make all the difference!
Tips for Nail Health
Taking care of acrylic nails is more than a routine; it's a necessity for healthy, beautiful hands. Regular cleaning and drying are fundamental, but there's more. Nourishing the nails is key. Cuticle oil isn't just an indulgence; it's vital for your natural nails' well-being. By incorporating these daily practices, you not only enhance the beauty of your nails but also fortify and safeguard them. This approach ensures your nails are visually appealing and in prime condition.
Care After Removal
Once you've bid farewell to your acrylic nails, the focus shifts to revitalizing and strengthening your natural nails. You might notice they feel softer post-removal. This softness is a natural response; your nails have been under a protective shield and now crave attention. Rehydrating them is crucial. A nail strengthener isn't merely a suggestion; restoring your nails' health and vigor is necessary. This post-removal care is essential to rejuvenate your nails, ensuring they remain healthy and resilient.
Frequently Asked Questions
Is It Okay to Remove Acrylic Nails at Home?
Yes, but with caution! Having the right tools and carefully following a step-by-step guide is essential. I want to remind you that rushing or using inappropriate techniques can cause damage to your natural nails.
Is It Bad to Soak Nails in Acetone?
Soaking in Acetone can dry out, but it's not inherently wrong. The key is to find the right balance. If you prefer to avoid Acetone, there are alternatives like using an E-file or other non-acetone-based methods, although they tend to be slower. In addition, some opt to soak nails in hot water with a bowl containing vegetable oil, soap, and cuticle oil; however, this method takes more time, and you must assist in detaching the nail.
What Is the Best Acrylic Nail Remover?
In my professional opinion, pure Acetone is the most effective. However, if you're looking for acetone-free options, there are nail removers specifically formulated for acrylics available on the market.
How Long Should I Soak Acrylic Nails to Remove Them?
The necessary time varies depending on the thickness of the nails and how much you sand down before applying the remover, but generally, around 20-30 minutes is usually sufficient. It's important to remember that patience plays a vital role in this process, so take the time to achieve effective and careful removal.
Can I Remove Them the Same Way I Remove Gel Polish?
Although both processes share some similarities, it's important to note that acrylic removal demands more time and patience due to its stronger bond with natural nails. The process requires meticulous attention and a more gradual approach to ensure effective removal without compromising the health of your nails.
Conclusion
Removing acrylic nails can be detailed, but it's completely achievable with the right tools and techniques. Always prioritize the health of your natural nails, and remember, whether at home or in a salon, taking the time to do it right is worth it.
Source: https://www.aad.org/public/everyday-care/nail-care-secrets/basics/healthy-nail-tips
Recent Posts
-

▷ How to Remove Acrylic Nails | Best Pro Tips
Step-by-Step Guide to Safely Removing Acrylic Nails Hello there! I'm Daniella Fer, the proud owner
-

What is Builder Gel? | Benefits & How to Use It
Step 1: Gather Your Supplies Firstly, assemble the essentials. You’ll need ac